
Initial Experiments
Week 1
Media about a Place:
For our first experiment to get more accustomed to the theme of this module, Space, Places and History, we were tasked with making a piece of media about a place in less than an hour. My group which consisted of James, Jess and me, had the idea to film the entrance of the forum on campus and record audio from different areas like the library or sports hall then play the audio over the video to show the conjunction of all these different areas on campus at this one location as everyone has to pass there. The idea changed a bit during filming, with an idea from James, as we decided to also film shots of the outside with no people and play the quiet audio we had recorded over those parts to show the tranquillity you get when you kinda take yourself out of busy environments, and we also put audio of machinery over it like a vending machine to show how in a quiet relaxing environment you get to sense stuff you would usually ignore. Then play the loud audio with a lot of talking overlayed on top of each other to show the almost sensory overload that you get in very busy places. We would then cut between these clips and create contrast between them.
This was a good exercise to get ideas flowing for what we could do for this module as a final piece.
Week 2
Degrading Image using Scanner:
For the next experiment we looked at different ways to possibly degrade an image and methods that other artists had done to do that. For the practical experiment we used scanners and scanned different objects,images or files we found around campus, in the scanner room or on us.
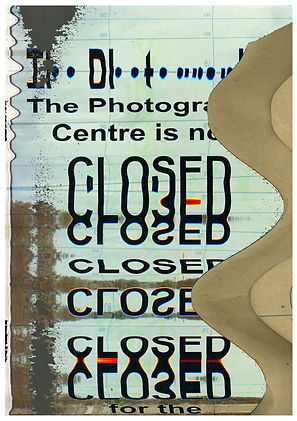
For this I decided to scan an old notice I found, a picture of two cows that was already in the printer, what seemed to be an envelope with some green writing I again found and some negatives from the forgotten images box in the scanner room. My idea with this was to move/drag the paper that I was scanning as the scanner moved, my initial idea was to distort the text and then in photoshop use the dragged out envelope overlayed over it for texture and the distorted picture of the cows as background, which is what I ended up doing, but I felt as this was kinda cheating the idea of this exercise so I tried a couple different ideas with just using the scanner. One of these ideas was to stack the envelope over the notice paper and as it scanned to move the paper out and try to create a transition between them but this did not end up working. The other idea was to put the negative film under the picture and drag it under it to try and create a manual overlay effect but the film was too didn’t it didn’t work exactly like I wanted it to. I then went with my initial plan to compile them together in photoshop. I ended up using this scan:
which I had just put off as a fail, by using the magic eraser in photoshop which in my opinion is a way of degrading an image in and of itself as it uses an algorithm to remove similar colours and you don't have a lot of control as to what it deletes. This created a cool effect as if the image had been scratched off.
I don’t think I will be using this for the final project as my group is thinking of doing moving pictures/video not photography but I will use the idea of degrading an image as we are planning on using point cloud technology.
Results:


360 Camera:
We also used 360 cameras and did experiments using them to broaden our range of skills and forms of media we could use for this project and future projects. As this was the first time using a 360 camera I was mainly focusing on figuring out how to use it, seeing what was possible and looking at how I could degrade the image. One of the ways I figured I could degrade the image, since I had a camera that switches between 180 and 360, I realised that if I started filming in 360 and then switched to 180 while still rolling it would create a cool effect, creating a reflection and sometimes just creating a visual mess which I thought looked cool. I also liked how this looked in tiny planet mode but it was very annoying to figure out how export it like that using the mobile app, I did end up finding a way to do it but it had a massive watermark on it which I found very annoying, I believe it would have been easier if I could have used the program for computers but because I didn’t have the serial code as I had already returned the camera I could not use it. I thought of two different ways I could use this method of switching between 360 and 180, first one is to have a subject in the video while it’s in 360 and have it disappear by switching to 180, if done right, I feel like this could look very cool. The other way would be to create a looped/mirrored world. The other thing I tried with this camera was, since the display was on the phone I could film the phone and create an infinite loop, I again couldn’t fully fledge out this idea as I was just messing around but I believe this could be used in a cool way if done right. I really liked the idea of using this medium, that would normally allow you to take in more information, to block out information and have the viewer see less or make them feel like they're missing out by always hiding something behind them. I will most likely not be using this medium for the project as I we are already planning to use point cloud as a medium but it is an interesting skill to know and have in under my arsenal for future projects, however from the results I got I feel as if it is a bit gimmicky medium, but this could be just because I didn’t have enough time to fully understand how to best use it.
360 Videos:
https://youtu.be/XSM1j7ho6eQ
https://youtu.be/HUUq4wnt_Mk
https://youtu.be/-hDotXc_5r0
Tiny Planet Videos:
https://youtu.be/h7S4zZIXWL4
https://youtu.be/R3lP8GUWO9Q
Sound Journey:
Third Experiment was to show a journey using only sound to get us thinking about how we can use sound to enhance our outcomes for this project. I recorded my audio using my phone (iPhone 11) and the Voice Record app.
And the journey I created was showing the peacefulness/calmness you can get from the most ordinary moments in life, so for example I recorded me cooking, open a can, opening chips, a train arriving and some more everyday activities. This was inspired by clips like these:https://youtu.be/i5T6Fnbq34c in anime when they portray cooking or traveling and the calmness and safety that people feel from watching them. At this point me group had somewhat already decided on what we will be doing which didn't really need foley audio but my audio is something I've been wanting to improve so it was a useful exercise for that.
Results:
Max Experiments:
As a class lastly we did 3 experiments with Max, a visual programming language which can be used to create stuff like installation works or code which takes in input from any camera or sensor like a microphone or hand tracking and create an output from the code, I'm sure it has other uses as well but these were the main things we learned about. I only attended 2 of these tutorial due to a doctor's appointment. The first one I managed to catch was an intro to max where we created a audio interactive project, the code I made from this would take the audio from the microphone and if the sound was bouncing around regular talking it would trigger a button that would turn on and off the camera but since the trigger level was so low it would glitch out the camera which I thought looked cool as I was somewhat thinking about "degrading the image" using this software which is something we had been talking about it in previous lectures, at the same time I had another trigger which would react to very loud noises and this would turn of the camera permanently until that noise level was reached again, at least that was how it was supposed to work but I can't remember how successful it was in testing.
The other tutorial I managed to catch we learned how to use the camera as an input to detect motion, my code was quite simple in theory as it would simply detect motion and would speed up and slow down a video that was playing depending on the going from left to right or right to left.


*Screenshots don't work as I didn't have a webcam when screenshotting them.
These tutorials where interesting and good at teaching how Max works, which I could/I am planning to use in future projects but for this project, as we had already decided on using point cloud technology, we didn't really have a way to implement Max into it and even if we did we already had a lot to figure out in how to create point clouds we did not have the time to also use Max.
Point Cloud Experimenting:
Figuring out how to create Point Cloud:
After having a conversation with Julian about our idea and the plausibility of using and creating point cloud 3d environments I did some experimentation and research on this. To do this I found a 3d model on SketchFab, the model I found was in a obj file format, which I later found was the easiest file format to use from the ones I tried. I then tried different methods to turn this .obj 3d model into point cloud data.
ReCap Pro & ReCap Photo (Didn’t Work):
-
The point cloud that ReCap Photo created had too few points and when viewed in ReCap Pro it would just be like 6 dots in a 3d environment.
CloudCompare (Worked):
-
From the ones I tried CloudCompare worked the best initially as it could most 3d models and convert them into point cloud data, so this was the method I decided to go for. Figuring out this much was easier than I thought even though it took extensive research to find out about CloudCompare, but the biggest issue was figuring out how to visualise these in a way that looks good like our inspirations and animate a camera going through it, which proved to be very difficult.
(Later) Agisoft Metashape (Unsure/Requires Subscription):
-
I found out about Agisoft Metashape later, after finding this tutorial: IRL THEATER MODE | Point Cloud [TUTORIAL] when looking for how I can visualise the Point Cloud, in the tutorial they used Agisoft to create a Point Cloud from a lot of images which he gets from a video on low frame rate. We later tried to use this here: Developing the Project but it had a lot of issues at least for us.
Other Programs/Methods That Might Work, Not Tried:
-
Meshroom
-
RealityCapture (Possibly Expensive)
-
RealityScan (Unknown Quality)
-
Try ReCap Pro Again
-
3DF Zephyr
Using CloudCompare it was quite simple to get a 3d model (at least an .obj file) and turn it into Point Cloud data and also be able to export it in a range of file formats for whatever use I needed it for. The biggest enigma and issue was figuring out how to get this data in a program where I could visualise them, animate them and render them with a camera navigating through the Point Cloud 3d environment created. For this I tried a lot of different programs and methods whilst researching each possibility.
Autodesk Infraworks (Didn’t Work):
-
When I initially looked at how to create Point Clouds I found this tutorial (same reason I tried to use Recap Pro): Get To The Point - A Point Cloud Tutorial in this they showed how you could create a Point Cloud and view it in Infraworks. After trying it and fully viewing the tutorial I quickly realised this would not work at all as this was software for construction rather than anything to create an animation. After this I turned to 3D animation software to see if they worked.
Autodesk Maya (Didn’t Work):
-
Autodesk Maya is a 3D animation software and after Infraworks I tried multiple different 3D animation software to see if any could do what I wanted them to. With Maya there didn't seem to be any way to import Point Cloud data further reinforced by this forum post https://forums.autodesk.com/t5/maya-forum/point-cloud-import/td-p/6663532 which does note that I could use a plugin or code my own one but that would too hard and from the one they showed it did not seem to have the look we wanted so this was not the right choise. After this I tried multiple different 3D animation software while looking tutorials and forums to see if it would be possible to use listed below.
After Effect (Didn’t Work/Required Expensive Plugin):
-
Plug-In: Element 3D [199.95$] (Unsure if this plug-in would even work for what I need it)
Cinema 4D (Research shows that it wouldn’t work):
-
Through the University I could get free access to this service but it needed a processing fee: 10£ which I didn’t want to pay for only a chance at this working, I also looked up on the internet if it would be possible to put point cloud data in Cinema 4D and it did not seem possible.
Blender (Worked/Not Desired Look):
-
After looking all over the internet for any way to visualise Point Cloud I found this tutorial: Point Cloud Visualizer - Blender which used blender to visualize the Point Cloud so I decided to try it as well and it worked in the viewport of the program but I had an issue when trying to render what the camera saw as they wouldn't show up, I ended up finding a solution to this (*I can't remember the solution anymore *I also saw people using geometry nodes within blender to do this but it was too late as we had already found the best way which was using unity) however the way the pointcloud was visualized in little orbs which I hated how it looked.
Houdini (Worked Somewhat):
-
The next 3D animation software that I found that might be able to do Point Cloud was Houdini from this tutorial: HOUDINI + POINT CLOUD SCAN #1 Animated Distortion which was a pretty good and comprehensive tutorial and I followed it step-by-step, which was very hard as I realised that Houdini was very difficult to learn and very complicated as it uses nodes for almost everything which to some extent is its own programing language. Before I followed this tutorial I also did his beginner tutorial on Houdini to understand the basics and even from then I was having issues. But I managed to finish it and the final product was terrible, there were a lot of issues with the animation and colours so I must have gone wrong somewhere and at the same time the person making the tutorial also didn't show to render them out and that might have been where the problem was as I had to try and figure it myself, at the same even looking the animation that the person making the tutorial created, whilst it did look good it was not what we/I wanted the project to look like especially with the point being circles, so it was not worth trying to figure out how to fix these problems.
-
Results:
No Colour Grading Colour Graded
(Chance that since Houdini works and has the possibility for point cloud Cinema 4D or Autodesk Maya could also be able to, as they are often used for the same purpose but they would be too hard to figure out and there isn’t really any information on the internet of this possibility as far as I’ve searched.)
Unreal Engine (Worked):
-
After doing extensive searches on Google, Youtube, Forums and even old Twitter posts from Benjamin Bardou (our main inspiration for this) I finally randomly found this Reddit post by another creator that had used Point Clouds in the past to experiments and to visualize them he had used Unreal Engine 4: https://www.reddit.com/r/unrealengine/comments/n7nr8d/hello_unreal_guys_my_experience_with_point_cloud/?utm_source=share&utm_medium=web2x&context=3, a game development software but more importantly in the comments of the post he had replied to someone with a tutorial that he had used that explained exactly how to do this from getting the scans to visualizing them in UE4, this was kind of the foundation that we used to build this project. IRL THEATER MODE | Point Cloud [TUTORIAL]
-
So I took the Point Cloud I had already created and followed the tutorial and it was quite easy it didn't need any coding the lighting was easy to do and the main issues I had to figure out was that since I was using Unreal Engine 5 rather than 4 like the video the plug in was pre-installed on Unreal which confused me a bit but I realised and the other difference was the lighting as doing the same thing he was doing didn't work as everything would just go black but that was a pretty simple fix by just leaving a small amount of gain in the colour settings of the point cloud.
Results:
-
I realised after rendering that there were a lot of problems that needed to be fixed, like points coming in and out of render the camera doing random 360 degree turns (I later realized this could be fixed in the graph editor of unreal engine but it was just very tedious) and the look of the points wasn't perfect but this was a massive step in progress to make this project actually possible, and we could work out the kinks later, for example the rendering issue was most likely due to rendering it on a weak system and I could use another computer like James's or a school computer (this also proved to be an issue later as school computers only had Unity 3d and not Unreal Engine, this was one the contributing factors of why I switched my workflow to Unity later on)
-
I did try to fix some of the issues as seen above for example the camera and optimising the lighting/atmosphere so it renders better but it still was not perfect. I also realised it was quite hard to animate a virtual camera whilst you would think it's easier as you have more freedom, since this was my first time working with anything 3D I wasn't great at it.

No Colour Grading
Colour Graded
"Fixed" Camera No Atmosphere
"Fixed" Camera Optimised Atmosphere